High Dynamic Range (HDR) photography is a technique that has revolutionized the way we capture images, particularly in challenging lighting conditions. As I delve into this fascinating realm, I find that HDR allows me to capture a broader range of luminosity than what is typically possible with standard photography. This technique is especially useful in scenes where there are stark contrasts between light and dark areas, such as a sunset over a mountain range or the intricate details of a shadowy forest.
By merging multiple exposures, I can create an image that reflects the true essence of what I see, preserving both the highlights and shadows in a single frame. The beauty of HDR photography lies in its ability to convey the depth and richness of a scene. When I engage in this practice, I am not merely taking a photograph; I am crafting an experience that invites viewers to immerse themselves in the moment.
The process involves capturing several images at different exposure levels and then blending them together to create a final photograph that showcases the full dynamic range of the scene. This technique not only enhances the visual appeal but also evokes emotions, allowing me to share my perspective with others in a more profound way.
Key Takeaways
- HDR photography involves capturing a wider range of light and dark tones in a single image to create a more dynamic and realistic final result.
- When choosing equipment for HDR photography, consider a camera with auto exposure bracketing (AEB) and a tripod for stability.
- Look for locations with a wide range of light and dark elements, such as landscapes with bright skies and shadowed foregrounds, for stunning HDR photography.
- Set up your camera to shoot in RAW format and use manual mode to control exposure settings for HDR photography.
- Capturing the perfect exposure bracketing involves taking multiple shots at different exposure levels to capture the full range of light and dark tones in a scene.
Choosing the Right Equipment for HDR Photography
Selecting the appropriate equipment for HDR photography is crucial to achieving stunning results. I have learned that a sturdy tripod is an essential piece of gear, as it ensures stability during the exposure bracketing process. When I’m out in the field, I often find myself in situations where even the slightest movement can lead to misalignment between shots.
A reliable tripod allows me to maintain consistency across my images, which is vital for seamless blending during post-processing. In addition to a tripod, I also consider my camera and lens choices carefully. While most modern DSLRs and mirrorless cameras are capable of capturing HDR images, I prefer using a camera with manual exposure settings.
This feature gives me greater control over my shots, allowing me to adjust settings like aperture and ISO according to the specific conditions I encounter. Furthermore, I often opt for wide-angle lenses when photographing landscapes, as they enable me to capture expansive scenes with greater detail and depth. The right combination of equipment not only enhances my ability to create stunning HDR images but also enriches my overall photographic experience.
Finding the Perfect Location for HDR Photography

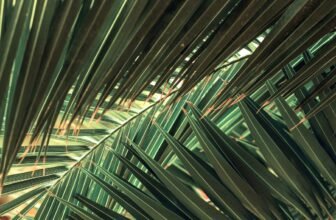
The quest for the perfect location is one of the most exhilarating aspects of HDR photography. I often find myself exploring various landscapes, from serene beaches to rugged mountains, each offering unique opportunities for capturing dynamic range. When scouting for locations, I pay close attention to the interplay of light and shadow, as well as the overall composition of the scene.
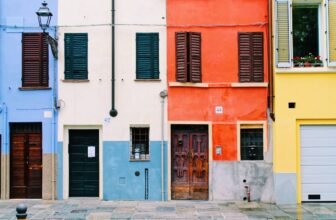
Early mornings and late afternoons are particularly magical times for photography, as the golden hour casts a warm glow that enhances colors and textures. In addition to natural landscapes, urban environments can also provide compelling subjects for HDR photography. The contrast between bright city lights and dark shadows creates an intriguing dynamic that can be beautifully captured through this technique.
As I wander through bustling streets or quiet alleyways, I remain open to unexpected compositions that may arise. Whether it’s an old building bathed in sunset hues or a vibrant street market illuminated by neon signs, each location presents its own set of challenges and rewards that fuel my creative spirit.
Setting Up Your Camera for HDR Photography
| Camera Setting | Explanation |
|---|---|
| ISO | Set to the lowest value to reduce noise |
| Aperture | Use a small aperture (high f-stop) for greater depth of field |
| Shutter Speed | Bracket your shots with different shutter speeds to capture a range of exposures |
| White Balance | Set to auto or adjust according to the lighting conditions |
| Focus | Use manual focus to ensure sharpness in all areas of the image |
Once I’ve chosen a location, setting up my camera for HDR photography becomes my next priority. I start by mounting my camera securely on the tripod to ensure stability throughout the exposure process. With my camera in place, I switch to manual mode, allowing me to have complete control over my settings.
I typically set my aperture to a mid-range value, such as f/8 or f/11, which provides a good depth of field while maintaining sharpness across the frame. Next, I adjust my ISO settings based on the available light. In most cases, I prefer to keep my ISO as low as possible to minimize noise in my images.
After determining these settings, I use the camera’s exposure bracketing feature to capture multiple images at different exposure levels. This step is crucial for HDR photography, as it allows me to gather a range of data that will later be blended together in post-processing. By carefully planning my setup and ensuring that all elements are in place, I set myself up for success in capturing breathtaking HDR images.
Capturing the Perfect Exposure Bracketing
Capturing the perfect exposure bracketing is an art form in itself. As I prepare to take my shots, I typically choose three to five different exposures: one at normal exposure, one underexposed, and one overexposed. This range allows me to cover both the highlights and shadows effectively.
When I press the shutter button, I often hold my breath in anticipation, knowing that each shot will contribute to the final image’s depth and detail. During this process, I remain mindful of the scene’s dynamic range. If there are particularly bright areas—like a sunlit sky—or deep shadows—such as those cast by trees—I may opt for additional exposures to ensure that no detail is lost.
The key is to strike a balance between capturing enough data without overdoing it; too many exposures can lead to unnecessary complexity during post-processing. By focusing on quality rather than quantity, I can create a solid foundation for my HDR images.
Post-Processing Techniques for HDR Photography

Post-processing is where the magic truly happens in HDR photography. After capturing my bracketed images, I import them into software like Adobe Lightroom or Photoshop for editing. The first step involves merging the images into a single HDR file using specialized tools designed for this purpose.
This process allows me to combine the best elements from each exposure seamlessly, resulting in an image that reflects the full dynamic range of the scene. Once merged, I dive into further adjustments to enhance the final image. This includes fine-tuning exposure levels, contrast, and saturation to achieve a balanced look.
While it’s tempting to push these sliders to their limits for dramatic effect, I strive for a natural appearance that retains the essence of the original scene. Additionally, I often apply selective adjustments using masks or brushes to emphasize specific areas or correct any imbalances that may have arisen during merging. Through careful post-processing techniques, I can elevate my HDR images from mere photographs to captivating works of art.
Composition and Framing for Stunning Landscape HDR Photography
Composition plays a pivotal role in creating stunning landscape HDR photographs. As I frame my shots, I consider elements such as leading lines, foreground interest, and the rule of thirds to guide viewers’ eyes through the image. By incorporating these compositional techniques, I can create a sense of depth and dimension that draws people into the scene.
I also pay attention to how different elements interact within the frame. For instance, including foreground elements like rocks or flowers can add layers to my composition and create a more immersive experience for viewers. Additionally, I often experiment with different angles and perspectives; sometimes crouching low or climbing higher can yield surprising results that transform an ordinary scene into something extraordinary.
By being intentional about composition and framing, I can enhance the impact of my HDR landscapes significantly.
Tips for Achieving Natural and Realistic HDR Landscapes
Achieving natural and realistic HDR landscapes requires a delicate balance between enhancing detail and preserving authenticity. One of my primary goals is to avoid over-processing my images; while HDR allows for dramatic effects, it’s essential not to lose sight of what makes a photograph relatable and genuine. To achieve this balance, I often start with subtle adjustments during post-processing rather than drastic changes.
Another tip is to pay close attention to color accuracy throughout my editing process. Maintaining realistic colors helps convey the true atmosphere of the scene and ensures that viewers feel connected to the image. Additionally, using tools like luminosity masks can help me selectively adjust highlights and shadows without affecting other areas of the photograph adversely.
By focusing on these techniques and remaining mindful of authenticity, I can create HDR landscapes that resonate with viewers while showcasing their inherent beauty. In conclusion, HDR photography is an exciting journey that combines technical skill with artistic expression. From understanding its principles to mastering equipment choices and post-processing techniques, each step contributes to creating breathtaking images that capture the world’s beauty in all its complexity.
As I continue exploring this captivating medium, I look forward to discovering new locations and refining my skills while sharing my unique perspective with others through stunning HDR landscapes.
FAQs
What is HDR?
HDR stands for High Dynamic Range. It is a technology that allows for a greater range of luminance between the lightest and darkest areas of an image or video.
How does HDR work?
HDR works by capturing and combining multiple exposures of the same scene to create an image with a wider range of colors and luminance. This results in more detail in both the shadows and highlights of the image.
What are the benefits of HDR?
The main benefits of HDR include improved contrast, more vibrant colors, and greater detail in both bright and dark areas of an image. This can result in a more realistic and immersive viewing experience.
Where is HDR used?
HDR technology is commonly used in photography, television, and video streaming services. It is also becoming more prevalent in gaming and virtual reality applications.
What devices support HDR?
Many modern smartphones, digital cameras, televisions, and computer monitors support HDR. Additionally, streaming devices such as Roku, Apple TV, and Amazon Fire TV offer HDR support for compatible content.
Is HDR the same as 4K?
No, HDR and 4K are not the same. 4K refers to the resolution of an image or video, while HDR refers to the range of colors and luminance. It is possible for content to be both 4K and HDR.